STOP THROWING AWAY YOUR HARD BOILED EGGS UNTIL YOU LEARN THE SHOCKING TRUTH BEHIND THE MYSTERIOUS GREEN RING AND THE SECRET KITCHEN HACK THAT GUARANTEES PERFECT GOLDEN YOLKS EVERY SINGLE TIME
There’s a familiar moment of frustration that plays out in kitchens everywhere: you slice into what should be a perfectly cooked hard-boiled egg, only to find an unappetizing greenish-gray ring around the yolk. For many home cooks, that discoloration raises immediate concerns—Is the egg bad? Did something go wrong? It’s enough to make you hesitate before serving it. In reality, though, this odd-looking ring has nothing to do with spoilage. It’s the result of a harmless chemical reaction, and once you understand it, you can easily avoid it and consistently cook better eggs.
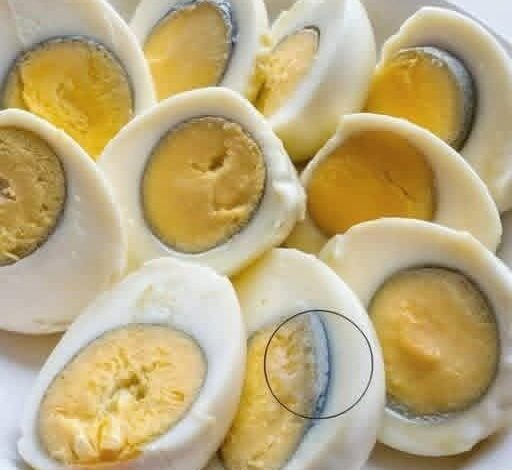
The explanation starts with the egg’s natural composition. Egg whites are rich in proteins that contain sulfur, while the yolk is packed with iron. Under normal conditions, these elements stay separate. But when an egg is exposed to high heat for too long, the sulfur and iron react and form iron sulfide. That compound is what creates the dull greenish-gray ring. In other words, the discoloration is simply a visual clue that the egg has been overcooked. While it may affect the texture slightly—making the yolk drier and sometimes giving off a faint sulfur smell—the egg is still perfectly safe to eat.
Overcooking is the main cause of this reaction. A common mistake is boiling eggs aggressively for 15–20 minutes in an attempt to ensure they’re fully cooked. Unfortunately, that method almost guarantees rubbery whites and chalky yolks. Achieving a smooth, bright yellow center requires more control over both heat and timing.
A better approach begins before the stove is even turned on. Instead of dropping eggs into already boiling water, place them in a single layer at the bottom of a pot and cover them with cold water—about an inch or two above the eggs. This allows the eggs to heat gradually, reducing the risk of cracking and promoting even cooking.
Next, bring the water to a gentle boil over medium heat. Once it reaches a steady boil, turn off the heat completely. This is the key step many people miss. Leaving eggs in actively boiling water drives the sulfur and iron reaction too far. Instead, cover the pot with a lid and let the eggs sit in the hot water. This method—often called carryover cooking—uses residual heat to finish cooking the eggs gently. For firm but tender yolks, letting them sit for about 12 minutes usually works well, though you can adjust between 9 and 12 minutes depending on your preference.
Cooling the eggs quickly is just as important as cooking them properly. Even after you remove them from heat, eggs continue to cook internally. If they’re left to cool on the counter, that trapped heat can still trigger the green ring. To prevent this, transfer the eggs immediately into an ice bath. The sudden drop in temperature stops the cooking process right away, preserving the yolk’s natural golden color and keeping the whites soft.
An added bonus of the ice bath is that it makes peeling much easier. The cold shock causes the egg to contract slightly inside the shell, loosening the membrane and allowing it to separate more cleanly from the white. Let the eggs sit in the ice water for at least 5–10 minutes, until they’re completely cool.
The age of the eggs also plays a small role. Very fresh eggs tend to be harder to peel, while eggs that have been in the refrigerator for a few days peel more easily due to slight changes in pH. Combining slightly older eggs with the cold-start method and an ice bath creates a reliable system for great results.
Using a timer is another simple but important step. The difference between perfectly cooked and overcooked eggs can be just a few minutes, so relying on instinct often leads to inconsistency. Setting a timer when you turn off the heat ensures repeatable results every time.
In the end, that green ring isn’t a sign of anything dangerous—it’s just evidence of too much heat for too long. With a little attention to timing, temperature, and cooling, you can avoid it completely. The result is a perfectly cooked egg with tender whites and a smooth, vibrant yellow yolk—proof that a small adjustment in technique can make a big difference in the kitchen.